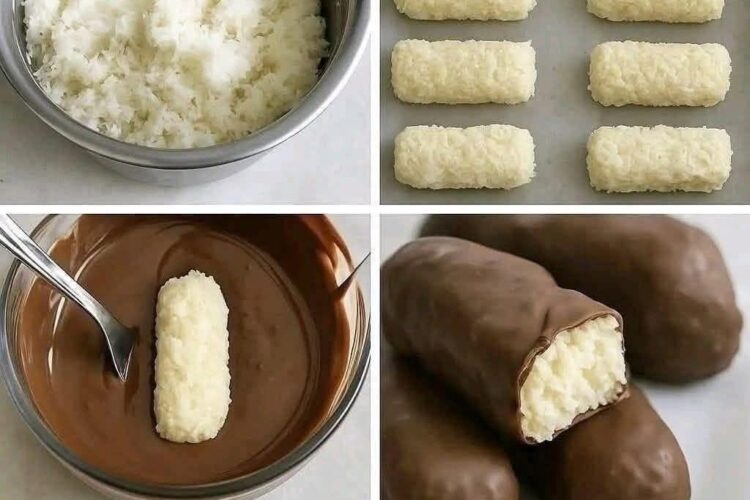
If you love the flavor of coconut and chocolate together, these homemade Low-Carb Coconut Chocolate Bites are an easy treat to add to your dessert rotation. They combine a creamy, slightly chewy coconut center with a smooth layer of dark chocolate, creating a satisfying contrast in every bite.
This no-bake recipe requires only a few basic ingredients and does not involve complicated baking techniques. The coconut mixture is prepared, chilled until firm, cut into small pieces, and covered with melted chocolate. After another short chilling period, the chocolate hardens into a delicious shell.
These bites are especially convenient for anyone looking for a dessert with less added sugar. By selecting unsweetened coconut, a suitable low-carb sweetener, and sugar-free chocolate, you can create a treat that fits many lower-carbohydrate meal plans. Always check the nutrition labels of your ingredients because carbohydrate amounts can differ substantially between brands.
The recipe also works well for meal preparation. Make a batch ahead of time, store the pieces in the refrigerator, and enjoy one whenever you want something sweet without preparing an entire dessert.
1. Why You Will Enjoy These Coconut Chocolate Bites
There are several reasons this recipe is worth trying:
- No oven is required.
- The ingredients are easy to find.
- Preparation is simple enough for beginners.
- The finished bites are naturally gluten-free when appropriate ingredients are selected.
- They can be prepared ahead of time.
- The recipe can be customized with different flavors.
- Small portions make them convenient for serving.
- They can be refrigerated or frozen.
- Coconut and chocolate create a naturally complementary flavor combination.
- They are ideal for dessert trays, snacks, parties, and everyday treats.
2. Recipe Details
Recipe: Low-Carb Coconut Chocolate Bites
Category: Dessert or Snack
Preparation Time: 15 minutes
Freezing/Chilling Time: About 50–60 minutes
Total Time: Approximately 1 hour 15 minutes
Yield: About 16–20 pieces
Difficulty: Easy
Cooking Method: No-bake
3. Ingredients
Coconut Filling
- 2 cups unsweetened shredded coconut
- ¼ cup melted coconut oil
- ¼ cup full-fat canned coconut milk
- 3 tablespoons granulated low-carb sweetener
- 1 teaspoon pure vanilla extract
- 1 small pinch of fine sea salt
Chocolate Coating
- 1 cup sugar-free dark chocolate chips or chopped sugar-free dark chocolate
- 1 tablespoon coconut oil
Optional Additions
You can personalize the filling with one or more of these ingredients:
- ¼ teaspoon almond extract
- ½ teaspoon ground cinnamon
- Finely grated lemon zest
- Finely grated lime zest
- 1 tablespoon unsweetened cocoa powder
- Finely chopped roasted almonds
- Unsweetened toasted coconut
- A small amount of flaky sea salt
4. Understanding the Main Ingredients
Unsweetened Coconut
Shredded coconut gives these bites their characteristic flavor and texture. Choose an unsweetened variety because sweetened coconut can add considerably more sugar and carbohydrates.
Coconut Oil
Coconut oil helps bind the ingredients together. It also becomes firm when chilled, which helps the coconut center maintain its shape.
Coconut Milk
Full-fat coconut milk contributes moisture and richness. Shake the can well before measuring so the thicker coconut solids and liquid are evenly combined.
Low-Carb Sweetener
A granulated sweetener such as erythritol or a monk-fruit-based blend can provide sweetness without using conventional sugar. Sweeteners vary in intensity, so adjust the amount according to the product you use.
Vanilla
Vanilla gives the filling a warmer and more rounded flavor. Although only a teaspoon is needed, it makes the coconut taste more dessert-like.
Dark Chocolate
Chocolate forms the outer shell. Sugar-free dark chocolate provides a stronger cocoa flavor that balances the richness of the coconut center.
5. Prepare Your Tray
Start by lining a small baking dish or flat tray with parchment paper.
Leave enough parchment extending over two sides of the dish. These edges can later be used as handles for lifting the chilled coconut mixture out of the container.
A shallow dish is preferable because it allows you to create an even layer that is easy to cut.
6. Mix the Coconut Filling
Add the shredded coconut, low-carb sweetener, and sea salt to a large mixing bowl.
Stir the dry ingredients together until the sweetener is evenly dispersed.
Next, add the melted coconut oil, coconut milk, and vanilla extract.
Use a silicone spatula or sturdy spoon to mix everything thoroughly. Continue mixing until the coconut absorbs the liquid and the ingredients begin to stick together.
The mixture should be moist enough to hold its shape when compressed.
If it seems too dry, add coconut milk gradually, about one teaspoon at a time. Avoid adding too much liquid because an overly wet filling can become difficult to cut and coat.
7. Press the Mixture into the Dish
Transfer the coconut mixture to the parchment-lined dish.
Spread it evenly across the bottom.
Use the back of a spoon, spatula, or flat measuring cup to press the mixture down firmly. Compressing the coconut is important because it helps prevent the pieces from falling apart later.
Aim for a layer approximately ½ inch thick.
Take a moment to smooth the surface. An even layer will produce pieces that are similar in size and thickness.
8. Chill Until Firm
Place the dish in the freezer for approximately 30–40 minutes.
The goal is not necessarily to freeze the coconut mixture solid. Instead, you want it firm enough that you can lift it from the dish and cut it without crumbling.
If your freezer is particularly cold, check the mixture after about 25 minutes.
9. Prepare the Chocolate
While the coconut layer chills, prepare the coating.
Place the sugar-free chocolate and one tablespoon of coconut oil in a microwave-safe bowl.
Heat the mixture in short intervals of approximately 15–20 seconds. Stir thoroughly between each interval.
Continue until the chocolate becomes smooth and glossy.
Do not use excessive heat. Chocolate can become thick, scorched, or grainy when overheated.
You can also melt the chocolate gently using a double boiler. Keep the water below the bowl and stir the chocolate as it melts.
10. Cut the Coconut Center
Remove the chilled coconut layer from the freezer.
Use the parchment paper to lift it from the dish and place it on a cutting board.
With a sharp knife, cut the slab into small squares or rectangles.
You can also make miniature bars or bite-sized cubes.
Try to keep the pieces approximately the same size. Uniform pieces are easier to coat and create a more attractive finished presentation.
11. Coat Each Piece
Place a coconut piece into the melted chocolate.
Use a fork or dipping tool to turn it gently until the outside is covered.
Lift the piece and allow excess chocolate to drip back into the bowl.
Place the coated piece onto a parchment-lined tray.
Continue with the remaining coconut pieces.
If the coconut begins to soften while you work, return the remaining pieces to the refrigerator or freezer for a few minutes before continuing.
12. Add Decorations
While the chocolate is still wet, add any desired toppings.
For example, you can sprinkle the bites with:
- Unsweetened shredded coconut.
- Toasted coconut.
- Flaky sea salt.
- Finely chopped almonds.
- Lime zest.
- Lemon zest.
- A light dusting of unsweetened cocoa powder.
- A small pinch of cinnamon.
Add toppings before the chocolate hardens so they adhere properly.
13. Chill the Finished Bites
Once every piece has been coated, place the tray in the refrigerator for approximately 20 minutes.
The chocolate should become firm and form a smooth outer shell.
After the coating has completely set, transfer the bites to an airtight container.
14. Texture and Flavor
The ideal finished bite has a firm chocolate exterior and a softer coconut center.
The first flavor you notice is the cocoa-rich chocolate. As you continue chewing, the coconut becomes more prominent, followed by subtle vanilla and a gentle sweetness.
The contrast between the crisp shell and tender center makes these small treats feel more substantial than their size suggests.
15. Creative Variations
Almond Coconut Bites
Press a roasted almond into the center of each coconut piece before dipping it in chocolate.
Citrus Version
Add finely grated lemon or lime zest to the coconut mixture for a bright flavor.
Mocha Bites
Mix a small amount of instant espresso powder into the melted chocolate for a coffee-inspired variation.
Cinnamon Coconut Bites
Add ½ teaspoon of ground cinnamon to the coconut filling.
Double Chocolate Coconut
Add approximately one tablespoon of unsweetened cocoa powder to the filling for a stronger chocolate flavor.
Toasted Coconut
Lightly toast some of the shredded coconut before mixing it into the filling. Allow it to cool completely first.
16. Serving Ideas
These bites can be served in many different situations.
Try them:
- With coffee after dinner
- Alongside afternoon tea
- On a holiday dessert platter
- As a small afternoon snack
- In a lunchbox
- As part of a homemade dessert assortment
- After a family meal
- As a make-ahead party treat
Because they are served chilled, they are especially convenient when you want a dessert that can be prepared in advance.
17. Troubleshooting
The Filling Falls Apart
If the coconut mixture crumbles when you cut it, it may not contain enough moisture or may not have been compressed firmly enough.
Add a small amount of coconut milk to the mixture next time and press it firmly into the pan before chilling.
The Chocolate Is Too Thick
Chocolate can become thick if it is overheated or if water gets into the bowl.
Melt it gradually and keep all utensils completely dry.
The Coating Is Messy
Very soft coconut pieces can be difficult to dip. Chill the pieces thoroughly before coating them and work in small batches.
The Bites Are Too Sweet
Reduce the amount of sweetener in the coconut mixture or choose a darker-tasting sugar-free chocolate.
The Bites Are Too Firm
Allow them to sit at room temperature for several minutes before serving. Coconut oil becomes firm when cold, so the center will soften slightly as it warms.
18. Storage
Place the finished bites in an airtight container and refrigerate them.
For best quality, enjoy them within approximately one week.
If stacking the pieces, place parchment paper between the layers to prevent them from sticking together.
For longer storage, freeze the bites in a well-sealed freezer-safe container for up to approximately three months. When you want to serve them, transfer the desired amount to the refrigerator and allow them to thaw gradually.
19. Make-Ahead Method
These coconut chocolate bites are excellent for advance preparation.
You can prepare the entire batch, chill the finished pieces, and store them in the refrigerator. This makes them convenient for busy weekdays, planned gatherings, or weekend meal preparation.
For freezer storage, portion the bites into small groups so you can thaw only the amount needed.
20. Nutrition Considerations
The nutritional content will depend on the specific coconut, chocolate, sweetener, and coconut milk brands used.
For a lower-carbohydrate version, choose unsweetened coconut and a chocolate product specifically labeled as sugar-free or low in carbohydrates. Check the package information for total carbohydrates, fiber, and any sugar alcohols before calculating net carbohydrates.
Treats can still be enjoyed as part of a balanced eating pattern when portion sizes and individual dietary needs are considered.
21. Frequently Asked Questions
Can I use sweetened coconut?
Yes, but the finished dessert will be sweeter and will contain more sugar and carbohydrates. Unsweetened coconut is the better choice for a low-carb recipe.
Can regular chocolate be used?
Yes. If you are not specifically limiting sugar or carbohydrates, conventional dark or milk chocolate can be substituted.
Do the bites need refrigeration?
Refrigeration is recommended because it keeps the coconut filling firm and helps the chocolate shell maintain its texture.
Can I make round truffles?
Absolutely. Instead of pressing the mixture into a tray, shape small portions into balls, chill them, and dip them in melted chocolate.
Can I use another sweetener?
You can experiment with another granulated low-carb sweetener, but sweetness and texture may change depending on the product.
22. Final Recipe Instructions
For a quick reference, follow these numbered steps:
- Line a small tray with parchment paper.
- Combine shredded coconut, sweetener, and salt.
- Add melted coconut oil, coconut milk, and vanilla.
- Mix until the ingredients form a cohesive mixture.
- Press the mixture firmly into an even layer.
- Freeze for 30–40 minutes.
- Melt the sugar-free chocolate with coconut oil.
- Cut the chilled coconut layer into small pieces.
- Dip each piece into the melted chocolate.
- Allow excess chocolate to drip away.
- Place each coated piece on parchment.
- Add optional toppings while the chocolate is still wet.
- Refrigerate for about 20 minutes.
- Store the finished bites in an airtight container.
- Serve chilled or allow them to sit briefly at room temperature before eating.
These Low-Carb Coconut Chocolate Bites are a simple no-bake dessert that brings together creamy coconut and rich chocolate in a convenient bite-sized format. With a short ingredient list, flexible flavor options, and easy storage, they are a practical homemade treat for everyday snacking or special occasions.
