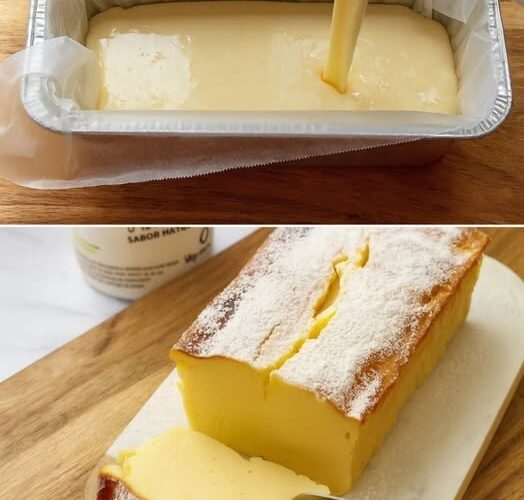
If you are looking for a simple dessert that feels indulgent without being overly heavy, this low-calorie Greek yogurt cake is a wonderful option. It has a soft, creamy texture that falls somewhere between a light cheesecake and a tender yogurt custard. The recipe uses everyday ingredients and can be prepared without complicated baking techniques.
Greek yogurt gives this cake its creamy texture while also adding protein. A small amount of flour or cornstarch helps the cake set, while eggs provide structure. You can sweeten it according to your taste and add lemon, cinnamon, vanilla, or cocoa for a different flavor.
The finished cake is especially delicious after chilling because the texture becomes firmer and creamier. It can be served plain, topped with fresh berries, or finished with a light dusting of powdered sweetener.
Why You Will Love This Greek Yogurt Cake
- Light and creamy: The texture is soft and smooth rather than dense.
- Protein-rich: Greek yogurt and eggs provide a useful amount of protein.
- Simple ingredients: Most of the ingredients are common pantry or refrigerator staples.
- Easy preparation: The batter can be mixed in one bowl.
- Customizable: Lemon, cinnamon, cocoa, fruit, and seeds can all be added.
- Great chilled: Refrigerating the cake gives it a pleasant cheesecake-like consistency.
- Suitable for portion control: Cutting the cake into smaller slices makes it easy to enjoy as a light dessert or snack.
Ingredients
For approximately 8 servings, you will need:
- 2 cups plain nonfat or low-fat Greek yogurt
- 2 large eggs
- 3 tablespoons granulated sweetener or your preferred sugar alternative
- 2 tablespoons cornstarch
- 1 teaspoon vanilla extract
- 1 teaspoon lemon zest, optional
- 1 tablespoon lemon juice, optional
- ¼ teaspoon salt
You can use regular sugar if you prefer. Keep in mind that changing the sweetener can change the calorie content.
Choosing Greek Yogurt
Plain Greek yogurt works best because it is thick and provides a creamy base. Nonfat Greek yogurt creates a lighter cake, while low-fat yogurt gives the finished dessert a slightly richer mouthfeel.
Avoid flavored yogurt if you want to control the sweetness and flavor yourself. If you only have regular plain yogurt, you can still make the recipe, but the batter may contain more moisture and may require slightly different baking time.
Step 1: Prepare the Baking Pan
- Preheat your oven to 350°F (175°C).
- Choose a small round cake pan, approximately 7–8 inches in diameter.
- Line the bottom with parchment paper.
- Lightly coat the sides with cooking spray or a very thin layer of oil.
- Set the pan aside while you prepare the batter.
Using parchment makes removing the chilled cake considerably easier.
Step 2: Mix the Yogurt Base
- Add the Greek yogurt to a large mixing bowl.
- Add the eggs.
- Add your chosen sweetener.
- Pour in the vanilla extract.
- Add the salt.
- If using lemon, add the lemon zest and lemon juice.
- Whisk until the mixture becomes smooth and evenly combined.
Try not to overmix the batter. The goal is simply to create a uniform mixture without large lumps.
Step 3: Add the Thickener
- Add the cornstarch to the yogurt mixture.
- Whisk gently until no visible pockets of cornstarch remain.
- Scrape around the sides and bottom of the bowl to make sure everything is incorporated.
Cornstarch helps the cake develop a more stable, creamy texture as it bakes.
If you prefer to use a small amount of all-purpose flour instead, you can substitute it in a similar quantity, although the texture may be slightly different.
Step 4: Transfer the Batter
- Pour the prepared batter into the lined cake pan.
- Gently tap the pan against the countertop once or twice to release large air bubbles.
- Smooth the surface with a spatula if necessary.
- Place the pan in the center of the preheated oven.
Do not worry if the batter looks thin. Greek yogurt cakes generally have a softer consistency before baking and become firmer as they cool.
Step 5: Bake the Cake
Bake the cake for approximately 30–40 minutes.
The exact baking time will depend on the size of your pan, the moisture in the yogurt, and your oven.
Look for these signs that the cake is ready:
- The edges should look set.
- The center should no longer appear liquid.
- A slight movement in the middle is normal.
- The surface may become lightly golden.
- The cake should not look completely dry.
Avoid overbaking because excessive cooking can make a yogurt-based cake less creamy.
Step 6: Cool Slowly
- Remove the cake from the oven.
- Place the pan on a cooling rack.
- Allow the cake to cool at room temperature.
- Once it is no longer hot, cover it and transfer it to the refrigerator.
- Chill for at least 2–3 hours before slicing.
For the best texture, chilling the cake overnight is even better.
As the cake cools, it becomes firmer and develops the smooth, creamy texture that makes this dessert resemble a lighter cheesecake.
Step 7: Slice and Serve
Once thoroughly chilled, carefully remove the cake from the pan.
Cut it into 8 equal portions using a sharp knife. For cleaner slices, wipe the knife between cuts.
You can serve the cake plain or add simple toppings such as:
- Fresh strawberries
- Blueberries
- Raspberries
- Sliced peaches
- A few banana slices
- Lemon zest
- Cinnamon
- Unsweetened cocoa powder
- A small spoonful of Greek yogurt
Fresh berries are particularly good because their natural sweetness and slight acidity complement the creamy yogurt cake.
Flavor Variations
1. Lemon Greek Yogurt Cake
For a bright and refreshing version, add:
- 1 teaspoon lemon zest
- 1 tablespoon fresh lemon juice
The lemon cuts through the creamy yogurt and gives the cake a fresh flavor that works especially well when served cold.
2. Cinnamon Yogurt Cake
Add:
- ½ teaspoon ground cinnamon
- A small pinch of nutmeg, optional
This version has a warm, comforting flavor and pairs nicely with sliced apples.
3. Chocolate Yogurt Cake
For a chocolate variation, add:
- 1 tablespoon unsweetened cocoa powder
Because cocoa powder adds a slightly bitter flavor, you may want to adjust the sweetener to taste.
You can also add a small amount of vanilla to make the chocolate flavor more pronounced.
4. Vanilla Berry Cake
Keep the basic recipe simple with vanilla and serve each slice with fresh berries.
This is one of the easiest ways to make the dessert feel special without adding a heavy topping.
Healthy Add-Ins
You can add extra ingredients to change the nutritional profile and texture of the cake.
Chia Seeds
Add approximately 1 tablespoon of chia seeds to the batter. They provide fiber and create a slightly more textured cake.
Ground Flaxseed
A tablespoon of ground flaxseed can add a mild nutty flavor and additional fiber.
Apple
Add approximately ¼ cup of finely grated apple. Squeeze or blot the apple before adding it to remove excess moisture.
Zucchini
Finely grated zucchini can also be used. Blot it thoroughly with a clean towel before mixing it into the batter.
Keep in mind that additional moisture may increase the baking time.
Texture Variations
Airier Greek Yogurt Cake
For a lighter, more airy texture:
- Separate the eggs.
- Mix the yolks with the yogurt and other ingredients.
- Beat the egg whites until they become foamy and form soft peaks.
- Gently fold the egg whites into the yogurt mixture.
- Transfer the batter to the pan.
- Bake as directed, watching carefully near the end.
This method can produce a slightly taller, softer cake.
Creamier Version
If calories are not your primary concern, replace approximately ¼ cup of the Greek yogurt with low-fat cream cheese.
Allow the cream cheese to soften before mixing so that it blends smoothly into the batter.
This produces a richer, more cheesecake-like result.
Helpful Baking Tips
- Use thick yogurt. Thick Greek yogurt gives the cake better body.
- Do not overbake. The center can have a slight jiggle when the cake is finished.
- Chill before cutting. A cold cake will be easier to slice cleanly.
- Taste your batter. If your sweetener is safe to consume before cooking, taste the mixture and adjust the sweetness before baking.
- Use parchment paper. This makes releasing the cake much easier.
- Avoid excessive toppings. Heavy sauces and large amounts of nuts or chocolate can substantially increase calories.
- Allow for ingredient differences. Nutrition and texture will change depending on the yogurt, sweetener, eggs, and toppings used.
Storage Instructions
Refrigerator
Place the cooled cake in an airtight container or cover it tightly. Store it in the refrigerator for approximately 4–5 days.
The chilled cake often tastes even better the next day because the texture has more time to firm up.
Freezer
You can freeze individual slices for approximately 2–3 weeks for the best texture.
To freeze:
- Slice the completely chilled cake.
- Wrap each slice tightly.
- Place the wrapped slices in a freezer-safe container or bag.
- Label with the date.
- Thaw individual portions in the refrigerator.
Allow the cake to thaw completely before serving.
Serving Ideas
For a simple low-calorie dessert, serve one chilled slice with fresh berries.
For breakfast or a snack, pair a slice with additional plain Greek yogurt and fruit.
For a dessert plate, add a little lemon zest and a few raspberries. You can also dust the top very lightly with cocoa powder or cinnamon.
The cake is naturally creamy enough that it does not need frosting or a heavy sauce.
Nutrition Information
The exact nutritional values depend on the specific ingredients and sweetener used. As a general estimate, one modest slice may contain approximately:
- Calories: 90–105 kcal
- Protein: about 7 g
- Fat: about 2 g
- Carbohydrates: about 10 g
Treat these numbers as estimates rather than guaranteed nutritional values. Using full-fat yogurt, sugar instead of a zero-calorie sweetener, or additional toppings will change the nutrition.
Low-Calorie Greek Yogurt Cake Recipe Card
Prep Time: 10 minutes
Bake Time: 30–40 minutes
Chill Time: 2–3 hours
Total Time: Approximately 3–4 hours including chilling
Servings: 8
Course: Dessert or snack
Texture: Light, creamy, cheesecake-like
Ingredients
- 2 cups plain nonfat or low-fat Greek yogurt
- 2 large eggs
- 3 tablespoons sweetener
- 2 tablespoons cornstarch
- 1 teaspoon vanilla extract
- ¼ teaspoon salt
- 1 teaspoon lemon zest, optional
- 1 tablespoon lemon juice, optional
Instructions
- Preheat the oven to 350°F (175°C).
- Line a 7–8-inch cake pan with parchment paper.
- Whisk Greek yogurt, eggs, sweetener, vanilla, and salt in a bowl.
- Add lemon zest and lemon juice if using.
- Whisk in the cornstarch until smooth.
- Pour the batter into the prepared pan.
- Gently tap the pan to remove large air bubbles.
- Bake for approximately 30–40 minutes.
- Remove the cake when the edges are set and the center has only a slight jiggle.
- Cool at room temperature.
- Refrigerate for at least 2–3 hours.
- Slice and serve chilled with fresh fruit or your preferred light topping.
Frequently Asked Questions
Can I make this cake without lemon?
Yes. Lemon is completely optional. Vanilla alone creates a simple, mild flavor.
Can I use flavored Greek yogurt?
You can, but flavored yogurt may contain additional sugar and will change the final flavor and nutritional values. Plain yogurt gives you more control over the recipe.
Why does my cake crack?
A small crack is not necessarily a problem. Cracking can happen when the cake is baked at a high temperature or for too long. Avoid overbaking and allow the cake to cool gradually.
Why is my cake soft after baking?
Greek yogurt cake continues to firm as it cools. Refrigeration is an important part of achieving the final texture, so do not judge the consistency immediately after removing it from the oven.
Can I make it sweeter?
Yes. Adjust the sweetener according to your preference and the type of sweetener being used. Different sweeteners have different levels of sweetness, so the amount may need to be changed.
Can I add fruit directly to the batter?
Yes, but use small amounts and choose fruit that does not release excessive moisture. Finely grated apple or well-drained fruit works better than very juicy additions.
